
How to Clean & Fillet Striped Bass: Step-by-Step Guide | Asalt Fishing
You landed the striper. Now learn how to clean it right. Our step-by-step guide covers everything from the first cut to pulling pin bones — so you get perfect, boneless fillets every time and nothing...
How to Clean &
Fillet
Striped Bass
A step-by-step guide to breaking down your striper — from whole fish to table-ready fillets with zero waste.
Striped bass is one of the most prized catches on the Northeast coast — and for good reason. The fight is legendary, the size is impressive, and the table fare is outstanding. But there's a gap between landing a striper and actually getting those beautiful white fillets onto a plate. That gap is the cleaning table, and it's where a lot of anglers feel uncertain.
The good news: filleting a striped bass is a learnable skill that gets faster every time you do it. A 28-inch fish will take you 15 minutes your first time. A month into striper season you'll be doing it in five. This guide walks you through every step — from scaling to skinning to pulling pin bones — so nothing goes to waste and every fillet comes out clean.
How to Fillet Striped Bass (Quick Steps)
- Make a cut behind the gills
- Run the knife along the backbone
- Separate the fillet from ribs
- Remove skin
- Trim and clean
Know the Regulations Before You Keep
Before we talk about cleaning, we need to talk about keeping. Striped bass are a heavily managed species on the East Coast, and regulations vary significantly by state and change season to season. Minimum size limits, slot limits, and bag limits are strictly enforced.
Striped bass regulations differ by state and are updated regularly. Always check your state's current rules before keeping any fish. In New York and New Jersey, for example, recreational size and bag limits have changed in recent seasons. Visit your state's Department of Environmental Conservation (DEC) or Fish & Wildlife website for the most current regulations before every trip.
| Attribute | Detail |
|---|---|
| Common Name | Striped Bass, Striper, Rockfish, Linesider |
| Scientific Name | Morone saxatilis |
| Typical Keeper Size | 28 inches and up (varies by state) |
| Flesh Color | White to off-white; firm and flaky |
| Best for Table | Smaller "slot" fish 28–35 inches; larger fish can be stronger in flavor |
| Fillet Yield | ~40–45% of whole fish weight |
Tools You'll Need
The single most important piece of equipment is a sharp fillet knife. A dull knife is the number one reason anglers get ragged, uneven fillets. If your knife drags or tears rather than glides, stop and sharpen it before you continue. A flexible 8–10 inch blade gives you the control needed to follow the spine and rib cage cleanly on a fish this size.
Preparing the Fish
Before you make your first cut, a few minutes of prep will make the entire process faster and cleaner.
Keep the fish cold. A fish that has been on ice is firmer and easier to handle than one that has been sitting in the sun. If you're cleaning dockside or at home, keep your striper iced right up until you're ready to begin.
Rinse the fish. A quick rinse under cold water removes slime, blood, and debris from the surface. This gives you better grip and a cleaner cutting surface.
Scale if desired. Striped bass have large, tough scales. If you plan to cook fillets skin-on — which many anglers prefer for grilling — scale the fish first using a scaler or the back of a spoon, working from tail to head. If you'll be removing the skin entirely, you can skip scaling.
Lay flat on a large, stable surface. You need room to maneuver a large knife around a big fish. A non-slip cutting board at a comfortable working height makes a real difference.
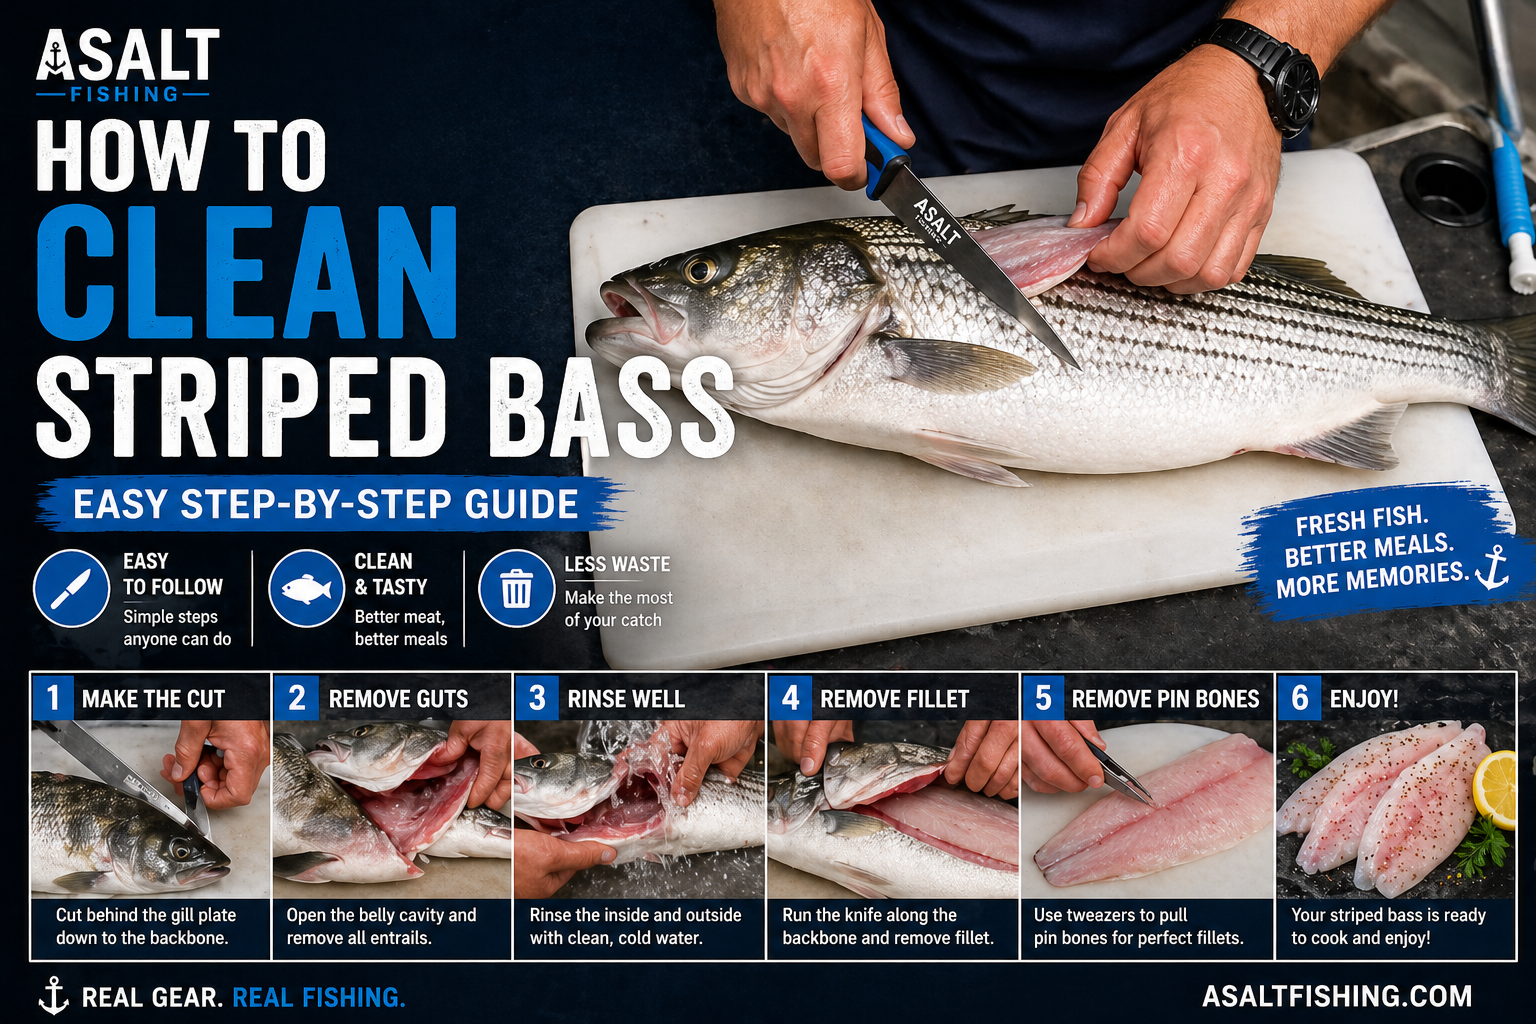
Step-by-Step: How to Fillet a Striped Bass
Striped bass yield two large side fillets plus two smaller belly fillets — four pieces of fish from one striper. The technique below focuses on maximizing yield while keeping cuts clean and efficient.
Make the Initial Head Cut
Lay the fish on its side, head facing away from you. Locate the pectoral fin — the fin just behind the gill plate. Angle your knife at roughly 45 degrees and cut down behind that fin toward the head, stopping when you hit the backbone. Do not cut through the backbone yet. This is your entry point for the fillet cut.
Keep the blade angled toward the head slightly to avoid wasting meat behind the collar.
Run the Knife Along the Backbone
Turn your blade flat and parallel to the cutting board. Starting from your head cut, glide the knife along the top of the backbone toward the tail. Use long, smooth strokes — let the knife do the work. Keep the blade in constant light contact with the spine so you don't leave meat on the bone. You should hear and feel the knife clicking over the rib bones.
Use your free hand to lift the fillet as you cut — this gives you a better view of the spine and helps keep the knife on track.
Cut Over and Around the Rib Cage
When you reach the rib cage section (roughly the middle third of the fish), you'll feel the blade bump up against the ribs. Angle the knife slightly upward and use short strokes to cut over the top of the rib cage, staying as close to the bones as possible. Don't try to cut through the ribs — navigate around them. This is the section where most beginners lose meat.
If it helps, make a second pass specifically along the rib cage after lifting the main fillet — you'll be surprised how much meat you can recover.
Free the Fillet at the Tail
Continue running the knife toward the tail until the fillet is attached only at the tail end. Angle the blade down through the skin at the tail and lift the fillet free. You now have your first large side fillet. Flip the fish and repeat on the other side for the second fillet.
Remove the Rib Bones from Each Fillet
Lay each fillet skin-side down. You'll see the translucent rib bones fanning across the belly portion of the fillet. Slide the knife under the rib bones at a shallow angle and glide along them to lift the entire rib section free in one piece. Discard the ribs or save the carcass for stock.
Cut just under the ribs, not through the fillet. A thin layer of meat may come with the ribs — that's normal. Go slow and you'll recover most of it.
Trim and Clean Each Fillet
Inspect the fillet and trim any ragged edges, red bloodline meat (if desired — it has a stronger flavor), and any remaining belly fat or dark tissue. A clean fillet at this stage means better flavor and presentation at the table. Rinse under cold water and place on ice immediately.
"A sharp knife and a slow first pass along the spine is worth more than any amount of speed. Take your time — the fish isn't going anywhere."
— Northeast Striper Fishing TraditionHow to Skin the Fillets
Whether to keep the skin on or remove it is a matter of preference and cooking method. Skin-on fillets hold together better on the grill and in a hot pan, and the skin crisps up beautifully when seared. Skinless fillets bake and poach more evenly and have a cleaner presentation for some recipes.
To remove the skin: Lay the fillet skin-side down on your board. At the tail end, make a small cut between the skin and the flesh just deep enough to grip. Hold the skin firmly with your free hand (a paper towel helps with grip), then angle the blade flat and glide it forward between the skin and flesh using a gentle sawing motion. Keep the blade as close to the skin as possible — this is where yield is won or lost.
For skin-on cooking, score the skin with 3–4 shallow diagonal cuts before cooking to prevent curling in the pan.
Removing Pin Bones
Striped bass have a row of pin bones running lengthwise through the center of each fillet — thin, flexible bones that sit just above the lateral line. They're easy to miss if you're not looking for them, and uncomfortable to encounter at the table.
To find them: Run your fingertip along the center of the fillet from head end toward the tail. You'll feel the tips of the pin bones poking up through the flesh, typically over a 4–6 inch stretch in the thickest part of the fillet.
To remove them: Use needle-nose pliers or dedicated fish tweezers. Grip each bone as close to the flesh as possible and pull with a firm, smooth motion angled toward the head end of the fillet. This direction follows the natural angle of the bone and reduces tearing. Work through the entire row, bone by bone.
Run your finger across the fillet after pulling all visible pin bones to confirm you've got them all. A few minutes at the cutting board saves an awkward moment at the dinner table.
Pro Tips for Better Fillets
- Sharp knife, every time. Run your blade across a honing steel before every fish. A sharp knife glides; a dull one tears.
- Work cold. Keep the fish iced until the moment you start cutting. Cold flesh is firmer, cleaner, and easier to fillet.
- Long strokes on the backbone. Short, choppy cuts leave a washboard of meat on the spine. Long, smooth strokes maximize yield.
- Don't rush the rib cage. This is where most meat gets left behind. Slow down, angle the knife correctly, and make a dedicated recovery pass if needed.
- Remove the bloodline if desired. The dark red strip running down the center of each fillet is the lateral line muscle. It's completely safe to eat but has a stronger, more pronounced flavor. Many anglers trim it out for a milder result.
- Save the carcass. The striper carcass — head, spine, and collar — makes an excellent fish stock or chowder base. Don't throw it away.
- Ice immediately. Fillets degrade fast at room temperature. Get them on ice the moment they're cut and keep them there until cooking.
Storing & Freezing Your Fillets
Refrigerator: Fresh striper fillets should be cooked within 2 days of cleaning. Store them on a plate or in a container, loosely covered, in the coldest part of your refrigerator. Placing the container on a bed of ice in the fridge extends freshness.
Freezer: Striped bass freezes exceptionally well. For best quality, vacuum seal fillets before freezing — this prevents freezer burn and preserves flavor for up to 6 months. If you don't have a vacuum sealer, double-wrap tightly in plastic wrap followed by a zip-lock bag with all air pressed out. Label with the date.
Thawing: Always thaw frozen striper in the refrigerator overnight — never at room temperature. For faster thawing, place sealed bags in cold water. Pat completely dry before cooking.
| Storage Method | Maximum Time | Best Practice |
|---|---|---|
| Refrigerator | 1–2 days | Store on ice; cook as fresh as possible |
| Freezer (vacuum sealed) | Up to 6 months | Best quality within 3 months |
| Freezer (zip-lock) | Up to 3 months | Press all air out; double-wrap |
Frequently Asked Questions
Do you need to scale a striped bass before filleting?
Not if you're removing the skin — you can skip scaling entirely and peel the skin off with the fillet. If you want skin-on fillets for grilling or pan-searing, scale the fish first. Use a scaler or the back of a spoon, working from tail to head under running water.
What size knife is best for filleting striped bass?
An 8–10 inch flexible fillet knife is ideal for striped bass. The length gives you enough reach to run the full length of the backbone in one stroke, and the flexibility lets the blade follow the contours of the rib cage. For very large fish (over 30 lbs), a longer semi-flexible blade can help.
How do you get rid of the fishy taste in striped bass?
Remove the bloodline (the dark red lateral line muscle) — it's the primary source of strong flavor. Soak fillets in cold salted water or milk for 30–60 minutes before cooking to mellow any remaining flavor. Cooking with lemon, garlic, and fresh herbs also helps brighten and balance the taste.
Is striped bass good to eat?
Yes — striped bass is considered outstanding table fare, particularly fish in the 28–35 inch slot range. The flesh is white, firm, mildly flavored, and flaky. It's versatile in the kitchen: excellent grilled, baked, pan-seared, or in chowder. Many anglers consider it one of the finest eating fish on the East Coast.
How long does it take to fillet a striped bass?
Expect 10–15 minutes per fish when you're learning. With practice, most anglers can fully fillet and clean a striped bass in 5–8 minutes. The rib cage removal and pin bone pulling are the steps that take the most time early on.
Can you eat the skin of striped bass?
Yes, striper skin is edible and delicious when cooked properly — especially when pan-seared or grilled until crispy. Make sure to scale the fish thoroughly if eating skin-on. Score the skin before cooking to prevent curling.
Show Us Your Striper
Tag your catch, your cleaning table, and your finished plate. We want to see it all.
Follow @asalt.fish on Instagram